Last Updated on March 25, 2025 by Rose Morah
Want to transfer ownership of a Tesla? This guide will walk you through the entire process, whether you’re the buyer (new owner) or the seller.
How Long Does It Take to Transfer Tesla Ownership?
On average, the transfer takes 3 to 5 days, though some people complete it in as little as a day. In our case, it took just one day, but others have reported waiting up to five.
Pro Tip for a Faster Transfer
To speed up the process, ask the previous owner to remove their account from the vehicle before you start. This simple step can make the transition much smoother!
See also:
Expert Tips For Selling A Used Tesla (From Experience).
Used Tesla Delivery Checklist (Inspecting A Used Tesla) Download Available.
Tesla Delivery Checklist: Model 3 & Y (Download Available).
How do you transfer Tesla to a new owner?
You can transfer via the Tesla mobile app or desktop. Reading on to learn the transfer process.
How to transfer Tesla ownership via the Tesla mobile app
NOTE: The new owner should create a Tesla account before the transfer process.
This is the account that you’re going to use in the mobile app.
To create a Tesla account use this link or follow the steps below;
- Go to Tesla.com
- Click on the menu.
- Scroll down and click on “Account”.
- Then click on “Create account”.
The following are the steps to follow when transferring Tesla ownership via the mobile app:
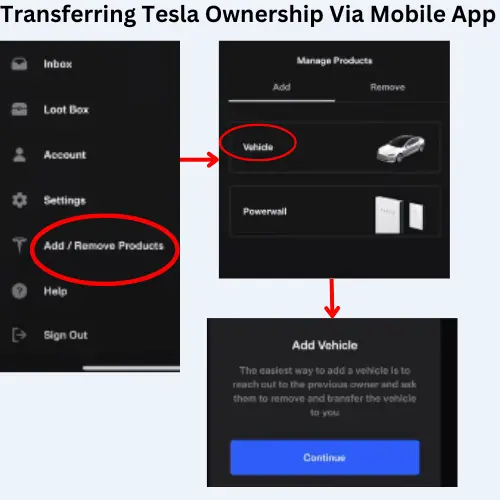
- Go to the Tesla mobile app and tap on “Profile”. It is in the top right corner.
- Then scroll to “Add or Remove products” as seen in the image below.
- Tap on “Vehicle” and you will see a pop-up as seen in the image below.
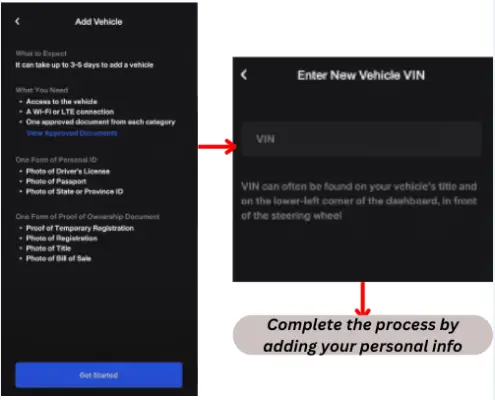
- Tap on “Continue”, and you will see a pop-up with information on what to expect when transferring ownership.
- Then tap on “Get started”.
- Enter vehicle VIN and click “Next”.
(Note, you will need to have the VIN in order to proceed to the next step).
- The next step is the registration process.
In this step, you will need to fill out your name, street address, email, etc. and upload the documents then click “Finish”.
- The last step is to wait for a notification of a successful transfer. As I had mentioned earlier, the time it will take will vary.
Related: How To Transfer Tesla Reservation.
You may also like: The Best Tires For Tesla Model Y.
See also:
5 Expert Tips For Buying A Used Tesla (What To Look For).
Should You Buy Or Lease A Tesla?
Complete Guide To Buying A Tesla (What to Know Before Ordering A Tesla).
How to transfer Tesla ownership on a desktop
NOTE: Make sure you have the Tesla mobile app downloaded on your phone because you will need it after completing the steps below.
- Go to Tesla.com.
- Click on “menu”. It is in the top right corner.
- Then click on “Account” and sign in to your Tesla account.
- Once you are logged in, click on “Add”. It is on the dashboard.
- A pop-up will appear requesting you to claim ownership. You will need to enter your VIN and then click continue.
- The next step is the registration process.
You will need to fill out your name, email address, street address, etc. and upload the documents then click “Finish”.
- The last step is to wait for the notification of a successful transfer. The time it takes will vary.
- When the transfer process is complete, you will need to log in to your Tesla mobile app to remotely control the vehicle using your phone and also to Supercharge by adding payment information.
You may also like:
Tesla Model Comparison: Which Tesla Model Should You Buy?
How Much Does A Tesla Maintenance Cost?
Model Y vs Model 3: Which One Should You Buy?
Common Tesla ownership transfer issues
- The seller’s credit card is still being charged for Supercharging
According to reports by some buyers who bought their Tesla on Carmax and other platforms, their Supercharging was still being charged to the seller’s credit card.
Well, most of the time, this is the case for sellers who sell the car without doing a factory reset and transferring ownership to the new owner.
In the case of Carmax, the seller should have transferred the ownership to Carmax’s account, the ownership is then transferred to the buyer once it gets a new owner.
- Tesla service center is billing the seller’s credit card instead of the buyer’s
There were also some reports of the former owner being billed after the new owner took the Tesla for service a few months after they had done the transfer of ownership.
Some previous owners have also been charged for the new owner’s insurance and other services.
Fortunately, after they contacted Tesla support, Tesla acknowledged that it was a mistake. However, it took time for them to receive their money back.
If you find yourself in such a situation, this is what I’d recommend:
- Step 1: Contact Tesla about the issue.
But if Tesla acknowledges the mistake but goes silent about the issue and doesn’t refund, go to step 2.
- Step 2: File the dispute through the Credit Card company. This will speed up the refund process. The same goes for insurance.
| These two steps are important because some card companies will want to first find out if you tried to resolve it with the merchant (Tesla). You can share with them your email thread just in case. Some people fear going through step 2 because of fear of getting banned by Tesla. However, it is important to note that this is not a chargeback request, you are simply claiming funds that were charged from your account without your knowledge/authorization. This will help save you time spent claiming your money back. |
- Tesla ownership transfer not working
One of the most common problems with the Tesla ownership transfer is being unable to claim ownership during the transfer process.
Some new Tesla owners who have tried going through the transfer process claimed to have been unable to proceed to the next step after entering the VIN.
That means that they are unable to register and upload proof of ownership.
This can be quite annoying especially if you do not know who the previous owner was.
What’s the solution to this problem?
I know of a Tesla owner who was able to solve the issue by renaming the car and other things that the app tells you, and the error notification disappeared.

